From: Elizabeth
Sent: Thursday, June 27, 2024 4:21 PM To: Robin McGregor <[email protected]> Subject: A Greenhouse for Elizabeth. Hi Robin, I hope you had a good journey home. My Greenhouse is Magnificent !!!!! I absolutely Love it. When I came on the road I could see the lovely cresting and the finials. The shelves , potting bench and tray are brilliant and all just the right height. Thank you for all your hard work over the past couple of days especially in the heat. Though probably better that it pouring down like last time. Thanks once again. It is my dream Greenhouse. Best wishes From Elizabeth
0 Comments
 
  Thanks again for my lovely new greenhouse Robin.
All the best Robert  Over to Sheffield this week to build the base for a relatively small greenhouse - but which will be very tall and packed with features. My customer loved the "Greenhouse for Bob" video of another one I built over in Sheffield many years ago and this will be similar.
Digging out the base was tough going - so much rock you couldn't get a spade in at all. I dig out the whole area with a mattock and my hands. So glad it was only a small base. It took me the whole first day of around 9 hours just to lay the foundations. 
I built the internal floor level up. I set some edging in wet concrete to retain the path and give the level point then filled with hardcore, sand and terram sheeting to stabilise before laying setts in a dry sharp sand cement mix.  
Heavy rain again for most of this week - and the gazeebo once more comes out to save the brickwork. I'm building this one to fit the space of the previous greenhouse after removing the steel base. The whole area had been filled with a fine grit, which my feet kept sinking into. I laid terram sheeting over the whole lot and put a tonne of compacted crusher run down to stabilise the ground before laying a pathway and 20mm gravel. I also added an internal raised bed for tomatoes.
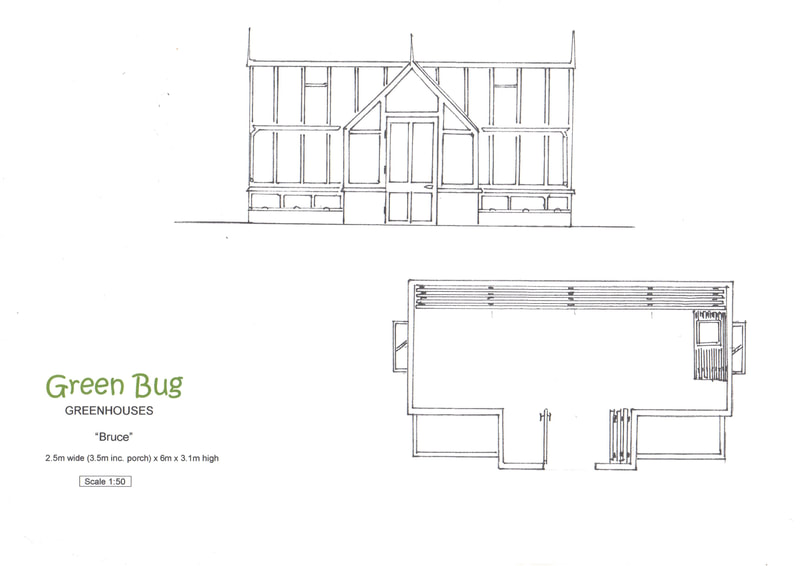 I'm building the base for a "Bruce" greenhouse this week. My customer also wants a raised bed along the whole back wall which I've tied into the main structure walls. Other contractors will be laying the flooring over this area before I come back.    
 Nice and close to home for this one. I'm building a "Miriam" greenhouse for a customer only about 40 minutes drive away. We had heavy storms this week - enough to make them newsworthy. I put the gazeebo up and then rescued what was left of it first thing in the morning. It did the job of protecting the brickwork though.   

 Hi Robin
Glad you got home safely. We are already enjoying the greenhouse which really is a piece of high quality craftsmanship. Many thanks Douglas  I had to make a few trips to build the base - given all the constant heavy rain we've been having I was rained off a couple of times. I have a gazeebo but it's not big enough to cover this area. However, I used it as a chance to bring full loads in the van of the completed greenhouse.  I couldn't finish laying the flooring given all the constant rain so I decided to build the structure and use the roof covering as shelter to get on and complete the floor. 
|
Click on each
|


 RSS Feed